Yum
Showing posts with label snack. Show all posts

Quest 80: Din's Fire Pepper Jelly

Ocarina of Time is a great game - one of my top 5 Zelda games. In trying to do something a little different, I want to share with you something that I have been making for quite sometime - pepper jelly. This particular pepper jelly is both sweet and spicy and works very well as an appetizer on a bed of cream cheese or in the morning on toast for a savory pick me up. The color of this jelly is bright and beautiful, and it reminds me of Din's Fire from Ocarina of Time. I hope you enjoy this recipe - I know my family sure does. Enjoy!

Gear!
8 8oz canning jars
8 matching canning lids
8 canning rings
2 large red bell peppers
1 large green bell pepper
2 habanero peppers
2 cups cider vinegar
1 pkg. powdered pectin
6 cups sugar

Quest!

Let's refresh our memories about canning from Quest 3: Red Chu Jelly

The purpose of canning is so that your food will last for a long, long time. It cannot do that if there are microbial organisms living with it. So what do we do? We kill ‘em all! . . . Well, as many as possible. Throughout the canning process, it is important to have a pot of almost boiling water on hand to put things like spoons and ladles in so they stay sterile as we go.

You will need to acquire (through legal means) a set of 8 oz. jam jars with metal rings and lids. Please do not try to reuse the Grey Poupon jar or any other crazy jar you have in your house, you are looking for a headache. Canning jars are made for what we are putting them through and I cannot and will not guarantee any sort of success with crappy jars. When they are empty, reuse your jam jars and the rings again and again. So don’t worry, they pay for themselves in a couple of uses. Note: You can only use the lids once. It’s okay – I don’t want my next batch of blueberry syrup to taste like beets anyways. Lids are relatively cheap.

Besides the jar assemblies, you will also find handy a jar funnel, head space measuring tool & jar tongs. These come in a kit at places like Target & Fleet Farm. Some kits even come with a handy magnet to help you take the lids out of the boiling water later. Other items you will need are a ladle, a couple of tea towels, paper towels, either labels with your product information or a sharpie pen.


There are two methods for sterilizing your jars that I would recommend. One is to boil them in a huge pot of water on the stove top for at least 5 minutes. I add sanitizing powder too. The nice this about this method is that you already have your pot for sterilizing everything else. 

But this does take up a lot of space. So the alternative method is the dishwasher. Place your jars on the top rack and instead of using your normal gel or tablet, use a sterilizing powder like OneStep. I steal out of my husband’s stash – he uses it in the wine making process.


Now, let us proceed . . .

In a food processor, add roughly chopped up red, green and habanero peppers with the seeds removed.
 Add the pureed mixture to a heavy bottomed 6 quart pot. Add cider vinegar and pectin and bring to a boil. Cook for another minute.
 Add sugar to the mixture and stir until dissolved. Set a timer for 6 minutes and boil until the timer runs out. 

Place lids in a small pot and bring to a boil. This softens the wax on the lids.


The jelly is ready. You should have 8 prepped, sanitized 8 oz. jelly jars for this recipe. Run your finger along the top of the jar before you start to make sure the edge of the jar is smooth. If it is rough, you may get leaks and is a sign that your jar is broken. Be sure to check even if they are brand new jars before you use them.
Ladle the jelly into the jars using the funnel. Measure to see that you have ½ inch of head space  The correct amount of head space is important because it allows the jar to seal properly. Wipe the rim of the jar with a clean, damp cloth. I dip mine in the water from sanitizing the jars.


With the magnet, fish out the lids and place them on the jars. Add the metal rings to the jars. Tighten just so they are hand tight. Do not wrench on the jars, we want to prevent leaks, but allow the air to escape the jar when the lid seals.

Now for sealing . . .

You have two options for sealing. One options is to place in a water bath (a large pot of boiling water) for  5-10 minutes. Or you can utilize what I like to call the jam method . . .Once the rings are on, flip lid side down and let sit on the counter like this for 5 minutes.
Note: The jars are still hot.


Turn back right side up and leave them alone. Just walk away!!
You will hear them make a “puck” sound after awhile, meaning they have sealed.

When they have cooled, label and enjoy! If you have any jars that do not “puck” you will have to refrigerate and consume sooner than later.


Follow the ZeldaGourmet to bring 
LOZ into your home everyday! Enjoy!


Quest 65: Eenie and Meenie's Potato Nachos

Eenie and Meenie are back at again this week with another tasty treat from the garden. This week we are making nachos with a little twist - using steak fries as the base. These are super filling and super nummy. With endless possibilities for toppings, this may be a new favorite for game night. Enjoy!


Gear!
28 oz bag Frozen Steak Fries
1 cup Frozen Broccoli
1 cup Frozen Peas
1 1/2 cups Ham, diced
3-4 Slices Swiss Cheese
1 cup Cheddar Cheese, shredded
Sour Cream

Quest!

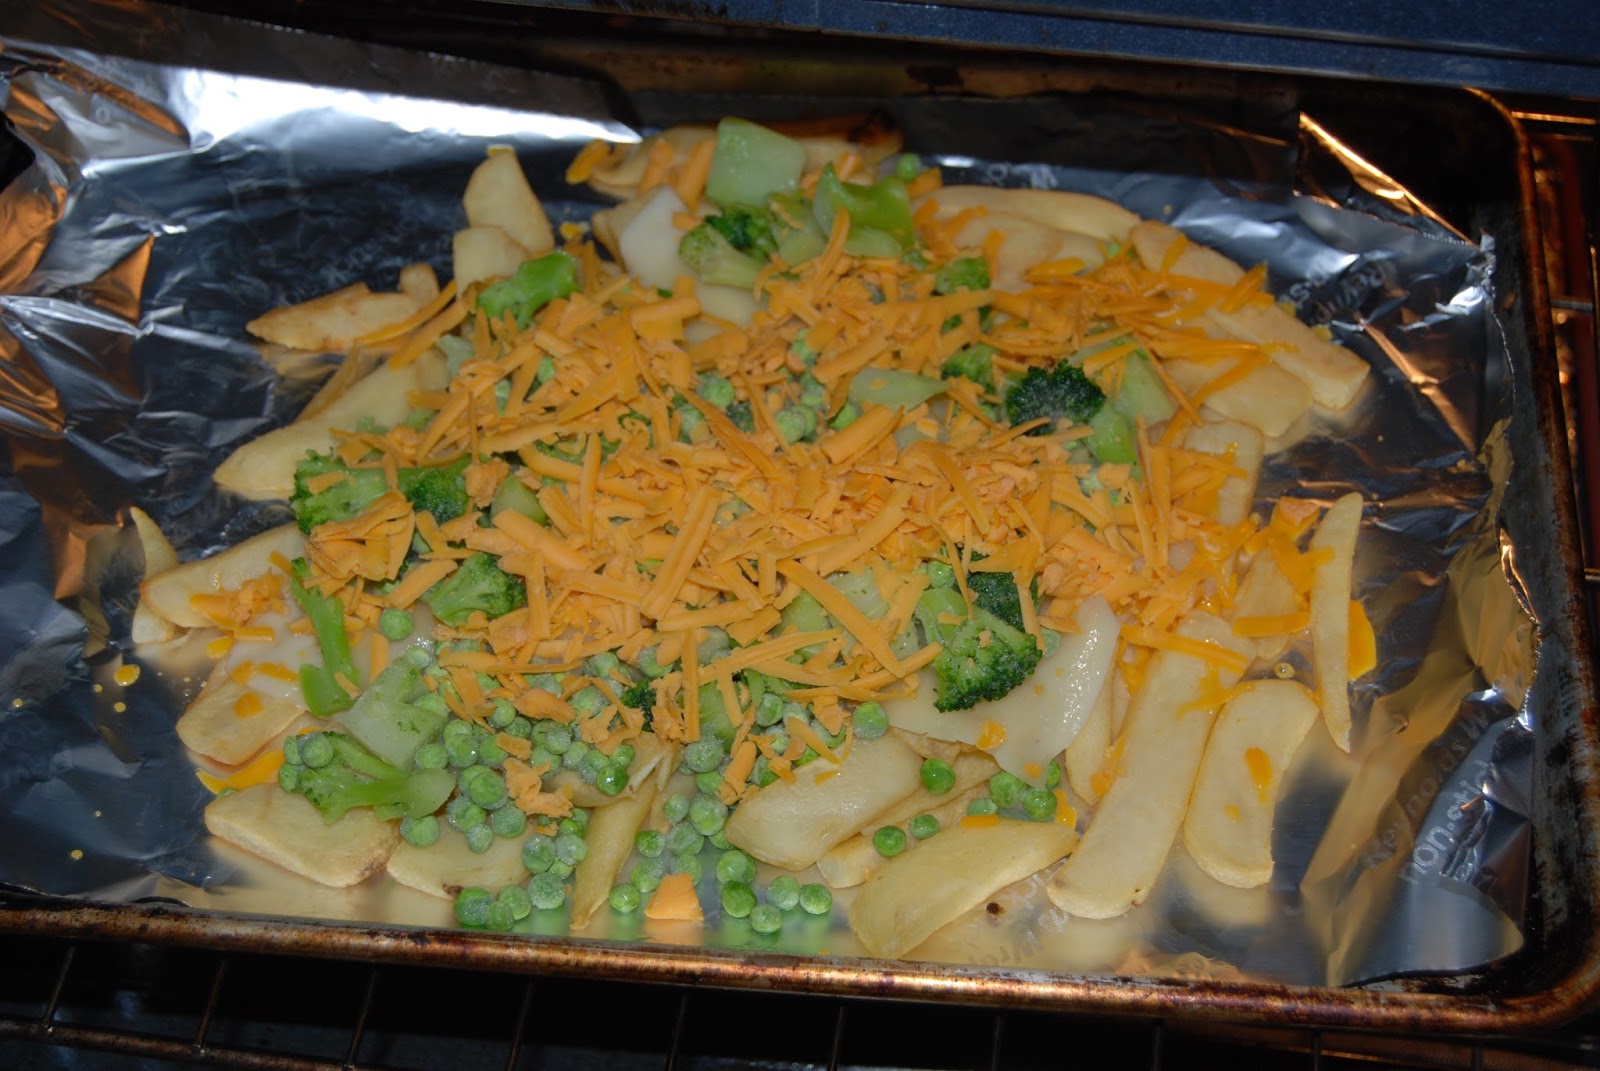
Preheat the oven to 450 degrees F. Place some nonstick foil on a cookie sheet and spread the fries across to make a single layer. Bake fries for 15 minutes.
In the meantime, chop up frozen broccoli and ham to get ready the toppings.
Take the fries out of the oven and add sliced cheese.
Add vegetables on top of the cheese.
Add another layer of cheese - this time shredded cheddar.
Top with ham and place back in the oven for 10-15 minutes until fries are golden and cheese is melted.
Add a few dollops of sour cream over the top and Enjoy!!

Be sure to follow on social media to stay up-to-date with all the latest from the Zelda Gourmet!

Quest 61: Rabbit Droppings

Rabbits work there way into many Legend of Zelda games, but whether it is Link turning into one or they are hiding behind rock on the Spirit Tracks - they all make poo. So, today's recipe is Rabbit Droppings, but we think you will like them because they are really egg free oatmeal chocolate chip cookie dough - so you don't have to worry about getting sick from uncooked eggs. Not that it ever stopped us from eating cookie dough before. Oh well, Happy Easter & Enjoy!


Gear!
1/4 cup butter, melted and cooled
1/4 cup dark brown sugar
2 Tablespoons milk
1/2 teaspoon vanilla extract
3/4 cup GF flour blend with xanthum gum
1/3 cup GF quick oats
1/4 cup mini chocolate chips
1/4 cup finely chopped walnuts


Quest!
Mix together the melted butter and brown sugar. Add a Tablespoon of milk, vanilla extract, and stir until combined.


Add the gluten-free flour and quick oats and stir until combined. If it is too dry for your purposes add a little more milk and stir until smooth.


Stir in the mini chocolate chips and then dig in!


Shape into small balls and Enjoy


Please comment, follow or just spread the word about The Zelda Gourmet! Enjoy!

Quest 55: Eenie & Meenie's Chard Chips

Eenie and Meenie have been working hard in the garden to bring about a bounty of fresh veggies for us to enjoy. Today, we will enjoy Swiss Chard in a delicious way by making them into chips. Lots of good flavor and even health-ish too. Enjoy!


Gear!
1 bunch of Swiss Chard
Olive Oil - Flavored if you wish
1/2 cup freshly grated Parmesan cheese
Sheet Pan
Aluminum Foil

Quest!

First, scurry over to the garden, farmer's market or local grocery store and pick out some lovely Swiss Chard - This variety happens to be Rainbow Chard, but this recipe works well for other greens such as Kale.


Preheat the over to 400 degrees F.With a chef knife, carefully separate the greens from the stems. You can use the stems for some other use, but we won't be using them today. Cut the greens into 3 inch pieces.


On a sheet pan lined with aluminum foil, spread out the greens so they are in a single layer. They will look rather fluffy at this point.


Sprinkle with salt and pepper and Parmesan cheese evenly over all the chard. Drizzle with a small amount of olive oil.


Bake for 25-30 minutes. Start checking it 20 minutes because it really depends on the amount of moisture in the leaves. Cheese will melt and begin to brown.


Some leaves may stick together. Just tear them and keep the cooled chips in an airtight bag until you are ready to enjoy!


Be sure to follow on social media to stay up-to-date with all the latest from the Zelda Gourmet!

Quest 46: Patra Cheese Plate


Having friends over for a gaming night? You should make it really fun with the food you serve. Now, there are a couple of great choices for this:

Navi Cookies
Tektite Cake Pops
Ocarina of Time
Cucco Deviled Eggs
Digdogger Dip
Secret Seashells
Buzzing Bees

But if you are looking for something different, today we will be preparing a Patra Cheese Plate that is sure to please. Enjoy!

Gear: Get the Printable Recipe Here!
For Adult Patra
8 oz. Cream Cheese
4 oz. Blue Cheese
1/4 cup Walnuts, chopped
1 oz Dried Cranberries, Chopped
Blue Gel Food Coloring
Large Candy Eyes
Sliced Almonds

For Patra Larvae
8 oz. Cream Cheese
5 oz. Olde English Cheese Spread
1/4 cup Almond Slivers, Chopped
1/4 cup Maraschino Cherries, Drained and Chopped
Small Candy Eyes
Sliced Almonds

For Presentation
GF Pretzel Sticks
Sliced Apples
Gluten Free Crackers

Quest:
Adult Patra
In a medium bowl, cream together cream cheese, blue cheese, walnuts, and cranberries with a sturdy spoon. Add food coloring and mix together until a uniform color occurs.


With sandwich bags on your hands, shape the cheese ball into a potato shape. Place in the middle of your party platter and add a large candy eye. Add layers of sliced almonds to create wings.


Patra Larvae
In a medium bowl, cream together cream cheese, olde english cheese spread, almond slivers, and cherries with a sturdy spoon.


With a cookie scoop, spoon cheese mixture onto party platter circling around the adult Patra. Add a candy eye to each patra front. Add sliced almonds for wings.


Arrange crackers, apples, pretzels, and other yummies to the plate and Enjoy!!


Be sure to follow on social media to stay up-to-date with all the latest from the Zelda Gourmet!


Quest 31: The Ocarina of Time

Has the thought of Daylight Savings Time got you down? Well in places where it affects you - have no fear! The Ocarina of Time can certainly help with this situation. Today we will be making these to just help with the shift in time. This is a slightly fancier version that you will find on the rice krispies website and I hope you enjoy!


The Gear! - Get the Printable Recipe Here
3 tablespoons butter
4 cups miniature marshmallows
1/2 cup peanut butter
3 T. Nutella
6 cups rice krispies  - I am using GF.
1 cup mini chocolate chips
2 bags Blue Candy Melts
3-4 tablespoons of Crisco

The Quest!

In a double boiler, melt butter. Add mini marshmallows and melt. 


Add peanut butter and Nutella - mix until smooth. Turn off heat.


In a large bowl, add Rice Krispies and marshmallow mixture. Mix together first with a spoon and then get in there with your hands - you are going to have to shape them anyways, so you might as well get dirty. When slightly cooled, but still workable, add mini chocolate chips. I originally used bigger chocolate chips - they were just too big - use the mini ones instead! 


Shape into an Ocarina shape - making sure that your stick out is secure and molded to be part of the shape. - Set aside on wax paper to fully cool.


In a double boiler, melt the blue candy melts. It was a little thick, so I added a few tablespoons of Crisco to thin it out. I also added a little blue food coloring to make them a little darker. 


Dip each Ocarina in the candy melt and return to waxed paper to harden and consider decorations.


Add any decorations: black sugar dots or chocolate chips for buttons. While candy melts are still soft so they stick. Wait until hardened and Enjoy!


If you like the Zelda Gourmet, become an email follower or Google +1 so that you get the newest recipes when they come out. Also Like us on Facebook, follow us on Tumblr and Pintrest! 

Created By Sora Templates