Yum

Quest 49: Monster Parts Cookies

Ever wonder what happens to all the enemies that Link defeats? Well their parts are most likely scattered around Hyrule and they are starting to stack up. So today was are going to take some of those parts and make monster cookies. Enjoy!


Get the Printable Recipe Here! 

Gear!
1 1/2 cups chunky peanut butter
1 cup packed dark brown sugar
1 cup  sugar
8 tablespoons butter, softened
3 large eggs
1 tablespoon vanilla extract
4 1/2 cups quick cooking oats
2 teaspoons baking soda
1 cup semi-sweet or dark chocolate chips
1 cup M&M's plain chocolate candies
1/3 cup sweetened chipped coconut
candied eyes, claws, teeth beaks - really whatever you have

Quest!

Preheat oven to 350 degrees F. In a mixing bowl, put together peanut butter, sugar, brown sugar and butter. Mix together until combined.
Mix in eggs, vanilla and baking soda.
Until creamy!
Add in your mix-ins: M&Ms, coconut and dark chocolate chips is what we used.
Mix in oatmeal until well combined.
Spoon 1 inch balls of dough onto a parchment lined sheet pan. Add your candy eyes, teeth, breaks, claws, etc. to each cookie.
Once they look somewhat like this bake for 15-20 minutes until golden brown around the edges.
Cool on a cooling rack after baking and Enjoy!
Be sure to follow on social media to stay up-to-date with all the latest from the Zelda Gourmet!

Quest 48: Chocolate Lava Puddles

Lava, lava everywhere, but how can we harness this molten element into something useful? Wait until it cools. In many LOZ games it has been common to dodge the lava puddles and lakes and even take advantage of cooled areas to help get across. Today, we too will be using the cooling of our lava to make a sweet treat we can all Enjoy!


Get Printable Recipe Here!

Gear!
1 lb. good chocolate
6 oz. butterscotch chips
12 oz. Red or Orange candy melts - vanilla flavored
2 tbsp. peanut butter
1/4 block. paraffin wax
1 lb.  roasted Spanish peanuts
Wax paper
Room to spread out

Quest!
 In a double boiler add together all the chocolate, butterscotch, candy melts and wax.
 Melt over medium heat until fully melted and worked together.
 Add in Spanish peanuts
 Mix together and remove from heat.
Set up a table with wax paper. Spoon small spoonfuls of the chocolate peanut mixture onto wax paper leaving a little room in between so they can spread out.
 Leave our chocolate lava puddles to cool.
It makes a whole bunch! When cooled and hard keep in an air tight container.


Be sure to follow on social media to stay up-to-date with all the latest from the Zelda Gourmet!

Quest 47: Chocolate Rope Snakes

If you are looking to make some quick rupees, going to level 2 will usually help you out with all the rope snakes around and leaving rupees with each one defeated. In fact, these creatures find themselves a prevalent enemy in many titles through the LOZ series. Today we are going to take this a step further and create a rope snake that is good enough to eat - even if you would not normally go for that sort of thing. Certainly an interesting sweet treat if you are looking to have a get together. Enjoy!


Get Printable Recipe Here!

Gear!
8 T. butter
4 oz. unsweetened chocolate
4 oz. semi sweet chocolate
1 cup powdered sugar
1 tsp vanilla
1 egg, lightly beaten
1/4 cup pistachios
1/4 cup chipped sweetened coconut
1/2 cup GF shortbread cookies, finely crumbed
3-5 T.powdered sugar
yellow, red and white decorator sugar
plastic wrap

Quest!


In a double boiler, melt butter and chocolates together until it is completely melted and chocolate is shiny.
Add powdered sugar and mix together until it becomes like a batter. Add vanilla. Add egg and mix until completely incorporated. Add pistachios, coconut, and shortbread cookies and gently stir in. Let cool slightly.

Spread out half of the batter onto plastic wrap.
Roll into a log and work air bubbles out - yeah, I know it doesn't look good - we'll work on that later.
Tie the ends off.
Shape the log shap into a z shape and place in the freezer for several hours.
Remove from freezer and take off plastic wrap. Using a chop stick or other wooden skewer, make imprints on the chocolate that make it look like scales, eyes, etc.

Dust with powdered sugar, then add red colored sugar for the eye and mouth and front markings. Add yellow sugar to the rest of the body of the snake.

We made the other half straight with just powdered sugar, then sliced it in half to show you what the inside looks like. It may be a little creepy, but it will certainly liven up your next party. Enjoy!


Be sure to follow on social media to stay up-to-date with all the latest from the Zelda Gourmet!

Quest 46: Patra Cheese Plate


Having friends over for a gaming night? You should make it really fun with the food you serve. Now, there are a couple of great choices for this:

Navi Cookies
Tektite Cake Pops
Ocarina of Time
Cucco Deviled Eggs
Digdogger Dip
Secret Seashells
Buzzing Bees

But if you are looking for something different, today we will be preparing a Patra Cheese Plate that is sure to please. Enjoy!

Gear: Get the Printable Recipe Here!
For Adult Patra
8 oz. Cream Cheese
4 oz. Blue Cheese
1/4 cup Walnuts, chopped
1 oz Dried Cranberries, Chopped
Blue Gel Food Coloring
Large Candy Eyes
Sliced Almonds

For Patra Larvae
8 oz. Cream Cheese
5 oz. Olde English Cheese Spread
1/4 cup Almond Slivers, Chopped
1/4 cup Maraschino Cherries, Drained and Chopped
Small Candy Eyes
Sliced Almonds

For Presentation
GF Pretzel Sticks
Sliced Apples
Gluten Free Crackers

Quest:
Adult Patra
In a medium bowl, cream together cream cheese, blue cheese, walnuts, and cranberries with a sturdy spoon. Add food coloring and mix together until a uniform color occurs.


With sandwich bags on your hands, shape the cheese ball into a potato shape. Place in the middle of your party platter and add a large candy eye. Add layers of sliced almonds to create wings.


Patra Larvae
In a medium bowl, cream together cream cheese, olde english cheese spread, almond slivers, and cherries with a sturdy spoon.


With a cookie scoop, spoon cheese mixture onto party platter circling around the adult Patra. Add a candy eye to each patra front. Add sliced almonds for wings.


Arrange crackers, apples, pretzels, and other yummies to the plate and Enjoy!!


Be sure to follow on social media to stay up-to-date with all the latest from the Zelda Gourmet!


Quest 45: Mushroom, Mushroom, Tuna Noodle Casserole!

Are you wandering around Hyrule with a bag full of mushrooms? Sick of trading those lovely fungi for magic powder that only sort of helps? Well fret no more, my friends. You can take all those lovely mushrooms and use them to create the base of a great Hyrulian classic dish: Tuna noodle casserole. Now, I know what you’re thinking - why would I do that instead of using cream of mushroom soup? Well, first it tastes delicious. Secondly, this is gluten free. Enjoy!

3 cups of GF chicken stock
1 T.  arrowroot or tapioca powder
2 cups gluten free egg noodles - uncooked
2 cans of tuna in water, drained
1 T. GF Dijon Mustard
2 T. chopped parsley
1/8 cup dried shitake mushrooms
1 cup of frozen peas
1 cup of half and half or cream
1 T. butter
2 cups of shredded cheddar cheese
1/2 cup gluten free bread crumbs

Quest:

In your slow cooker, add a slow cooker liner for easy cleanup. Then you can add the chicken stock and arrowroot powder and stir together. Add in all other ingredients except for 1/2 cup of cheese and the bread crumbs. Stir together. Cook on high for 3 hours or low for 6 hours.


Top with the remaining cheese and bread crumbs.


Let melt and enjoy!


Be sure to follow on social media to stay up-to-date with all the latest from the Zelda Gourmet!

Quest 44: Zucchini Muffin Minish Caps


It's zucchini time! I have been looking ways to incorporate more green ideas into the blog, and today I think I may have succeeded. Minish Cap is a great game in the LOZ series that takes advantage of size in a bigger way that Ocarina of Time. It also brings to life the hat that Link wears in a way that is beyond imagination. With this in mind, today we will attempt to make Minish caps to place upon our zucchini muffins. It will be an interesting and tasty quest that I hope you give a try! Enjoy!


Gear! - Get the Printable Recipe Here!
Muffins!
1/2 cup sugar
1/2 cup butter, softened
2 eggs
1/2 cup sour cream
1 t. vanilla
1/4 cup apple sauce - I used unsweetened
2 cups GF All-purpose flour with xanthan gum mixed in
2 t. cinnamon
1/2 t. cardamom
1 T. baking powder
1 t. baking soda
1 t. salt
1 cup finely grated zucchini
1/2 cup walnuts chopped

Streusel Topping!
1/2 cup brown sugar
1 T cinnamon
2 T. butter cold and cubed
1 T. GF flour

For the Minish caps!
carrots
zucchini
toothpicks
mandolin

Quest!
Preheat the oven to 375 degrees F. Prep a muffin pan with muffin liners. Cream together sugar and butter. Add eggs, sour cream, vanilla, and apple sauce. Mix together.


To the mixture, add flour, cinnamon, cardamom, baking powder, baking soda, salt, grated zucchini and walnuts.


Spoon the muffin mix into the muffin liners and push the thick dough into the liners to remove bubbles.


Make the streusel topping by adding all ingredient to a bowl and crumb with a fork. Do not cream!


Spoon the streusel topping over each of the muffins.


BEING VERY CAREFUL!! Set your mandolin to 1/8 inch setting. Slice zucchini lengthwise creating 12 equal pieces. A medium zucchini should get you just enough. Set the mandolin to 1/16 setting and repeat with peeled carrots.


After some trial and error, the best way to make little caps is to start rolling on one end until it makes a nice spiral. Use a toothpick to secure at the top. Add the carrot piece to bottom and press into the muffin. If you don't press them into the muffin, as it rises, it will push the cap off and it will tip over.
Make a cap for each muffin. I added a little vanilla sugar over the top of the caps.


Bake muffins for about 25 minutes or until a toothpick comes out clean. Remove from the oven and let cool for a few minutes and Enjoy!


Be sure to follow on social media to stay up-to-date with all the latest from the Zelda Gourmet!


Side Quest: Craft Night! Owl Quilt

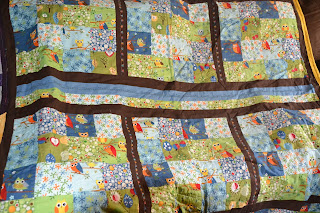
Kaepora Gaebora is a crazy owl that has a whole lot of say. Between Ocarina of Time and Majora's Mask, he is mostly not helpful, but at least has his heart in the right place in trying to give advice. In honor of this character, I have created an owl quilt that is just as crazy as he is. This quilt was made in square sections of 4 inch squares and then put together with 2 1/2 inch strips. Before putting together the layers of the quilt, I did some embroidery on the strips to add some extra embellishment. Quilting is a great hobby, and if you can sew with a 1/4 inch seam line in a straight line, you too can make a quilt! Enjoy!


Quest 43: Triforce Triple Berry Trifle

In the U.S. it is time once again to celebrate our independence and what better way than with things that are in season - Berries!! Being that there are so many berries in season all at once where I dwell, these work really well with our favorites like lemon curd and cool whip and cake. Don't worry - we'll make this Zelda related by using Triforce shapes. It may be a bit of a stretch, but it sure is delicious. Enjoy!


Gear! Get the printable recipe here!
1 yellow cake - I used a GF Betty Crocker mix this time
2 cups of lemon curd - ingredients below
6 oz. marscapone cheese
2 T. lemon juice
4 T. sugar separated
1 cup heavy whipping cream
2 cups sliced strawberries
2 cups blueberries
2 cups raspberries

Lemon Curd 
5 Egg Yolks
1 Cup Sugar
1/3 cup of fresh lemon juice and zest (about 3 lemons worth)

1 Stick of Butter - Cut into small pieces then chilled

The Quest!


First, let's make the lemon curd! We covered this in our Pi Day Special and I can't encourage you enough to make your own. It is so easy and so much cheaper than buying it. Anyways, in a double-boiler bowl, combine egg yolks and sugar whisk until smooth, about 1 minute. Zest and squeeze the lemons. Add juice and zest to egg mixture and whisk smooth. Place on double boiler. Continuously whisk until thickened over medium heat, approximately 8 minutes, or until mixture coats the back of a spoon and is generally the consistency of pudding. Remove promptly from heat and stir in butter a piece at a time. Transfer to a container and chill for at least 2 hours.

Next prepare your cake. You can make a cake from scratch, use a cake mix or a pre-made cake from the bakery - really whatever floats your boat. Cut your cake into small slices. Wash and prep your berries.
Note: I used a GF Betty Crocker Cake Mix. This makes the equivalent of a one layer cake. So, you may need to double your berries and cream filling if you are using a two layer cake. 


With a hand mixer, whip your cream with 2 T. of sugar until you have stiff peaks - not butter!!! Set aside. Beat your marscapone cheese with 2 T. of sugar until soft then add lemon juice and mix to combine. Fold in whipped cream.


In a bowl place a layer of berries. You can chooses to either keep your berries separated as I did or you can mix them together. Then add a layer of marscapone cheese mixture on top of the berries. The next layer is a layer of cake followed by a layer of lemon curd. Then we repeat the layers.


On the top of the layers, place three golden triangles of cake that were left from the remnants of cake. Divide the remaining berries into three parts around the triforce. Enjoy!


Be sure to follow on social media to stay up-to-date with all the latest from the Zelda Gourmet!

Created By Sora Templates