Yum
Showing posts with label dessert. Show all posts

Quest 101: Peanut Butter Labyrinth Cookies


Labyrinths are nothing new the LOZ franchise. We started with the lost woods that has turned up in nearly all generation from the orginial NES to the latest BOTW installment with not only the lost woods, but also two other labyrinths for us to tackle. But how do you capture that in an edible way?  Today, we will give it a try with peanut butter and chocolate goodness. The dough of this recipe is fairly sticky and delicate, but if you treat it right and are careful, they are just as good to look as they are the eat. Enjoy!

Gear!
1 cup Sugar
1 Egg
1/2 cup Butter
1/2 cup Chunky Peanut Butter
1 tsp Vanilla Extract
2 T. Milk
1/2 t. Baking Soda
1 1/2 cup GF Flour - We used Bob Red Mill's Baking Flour
12 oz. Chocolate Chips

Quest!


Start by creaming together the butter, sugar, peanut butter, eggs and vanilla extract. Add in the milk and then the flour and mix together until a soft, sticky dough comes together.
Roll the dough out on a piece of parchment or large silicone mat - parchment works easier. This one is more round, but the more rectagular you can get the dough, the better.

Melt your chocolate chips either with a double boiler or carefully in the microwave. Let the chocolate cool for a minute, then spead all the chocolate over the dough and spread to the very edge.


Using the parchment paper, carefully roll the dough like a jelly roll. Make it fairly tight, so there are no air gaps between the layers. You should end up with a lovely swirl. Divide the roll in half if too large for your fridge and wrap in plastic wrap before refrigerating for at least 30 minutes.
Preheat the oven to 350 degrees F. Slice your cookies into 1/2 inch slices and place on cookie sheet with parchment or silicone mat under cookies. Bake for 8 -10 minutes until golden around the edge.


Cool cookies on the sheet pan for about 3 minutes before transfering to a cooling rack. Bake remaining cookies and Enjoy!


Follow the ZeldaGourmet to bring 
LOZ into your home every week! Enjoy!


Quest 96: Chocolate Coconut Cave Cake


There are many, many caves in the LoZ series. Including the very first one where the Old Man warns that it is dangerous to go alone. Of course, he doesn't accompany you, but at least you end up with a sharp stick to protect yourself. Today, I have for you different kind of cave - a cave of wonders if you will - at least if you like coconut. The concept is pretty 1950s, but the results are gluten free and delicious. Enjoy!

Gear!
Gluten Free Chocolate Cake Mix -We used Pillsbury
Mayonnaise instead of oil in recipe, plus the ingredients on the box
1 tsp. Vanilla Extract

Filling:
2  egg whites
1/4  cup granulated sugar
1 cup shredded sweetened coconut flakes 
1 T tapioca flour 
1 tsp vanilla 

Glaze:
1/2 cup butter (1 stick)
3 T milk
2 cups powdered sugar

Quest!
Prep the bundt pan by thoroughly spraying the pan with non stick spray. Preheat the oven to 400 degrees F. Start with the cake mix. Find out what you need to make this cake mix and make it better! Exchange the oil with mayonnaise and add the other ingredients and mix well with a mixer. 


Add about half the cake mixture to the pan.
Get started on the filling. Whip egg whites until soft peaks form. Add in sugar and whip together.

Mix tapioca flour and coconut together and fold gently into the egg whites.
The result should come together in a chunk.


Spoon filling over the first half of the cake mixture. Top with remaining cake mixture. Bake in the oven for 45 minutes and check for doneness.

It will dome up and pull away from the edges when it is done.
When the cake is cool but not cold remove from pan. It should release easier than if you wait until it is cold.
Let's make glaze. Melt butter in a sauce pan until just melted. Take off heat. Add milk and powdered sugar. Stir until it makes a smooth glaze.

Drizzle over the completely cooled cake in a fancy design and Enjoy!

Follow the ZeldaGourmet to bring 
LOZ into your home everyday! Enjoy

Quest 91: Zora Eggs

Zoras have not been mentioned in our questing as of yet. Well today, we have prepared for you a lovely batch of Zora eggs. This rich and creamy dish is the prefect end to any meal. Enjoy!

Gear!
1 cup small tapioca pearls - not quick cooking
1 can of coconut milk
2 T. honey
1 tsp. vanilla paste
1 tsp. cinnamon
1 egg, separated

Quest!

Add tapioca pearls to a sauce pan.

Add coconut milk and bring up to a simmer.
Add honey, vanilla and cinnamon.
Cook until tapioca is plumped and start to look like fish eggs. Turn heat off and let cool slightly.
Separate your egg into two different bowls.
Beat egg whites until they come to a stiff peak. You can do this by hand or with a mixer.
Added egg yoke to the mixture and stir.

Until creamy and egg is cooked.Fold in egg whites to lighted up mixture.

Serve warm or cold with a dolup on whipped cream on top.


Follow the ZeldaGourmet to bring 
LOZ into your home everyday! Enjoy!

Quest 76: Maple Carrot Cake Muffins


In all the recipes that we have done, we have not considered Epona or anything even remotely associated with her. Now Epona is a good horse and deserves some recognition for all the times she has hauled me around Hyrule field on some side quest to find a - oooh piece of candy. So in honor of our friend Epona, we are making a carrot recipe - and don't worry it won't be the last. This is one of my favorite recipes and it's pretty easy too. With a little GF baking know-how, there is not much difference if you want to make this GF or regular flour. Enjoy!

Gear!
3 cups shredded carrots
2 cups GF AP Flour - with xanthium gum
1 cup sugar
1 t baking powder
1 t baking soda
1 t cinnamon
1/2 t salt
4 eggs
1 cup vegetable oil
1/2 cup maple syrup

Frosting
8 oz cream cheese
1/4 cup butter
1 t vanilla
1/4 cup maple syrup
Chopped walnuts - optional

Quest!

In your mixing bowl, add together carrots, sugar, cinnamon, eggs, vegetable oil, and maple syrup. Mix together
Add flour, baking powder, baking soda, and salt. Mix together until smooth. Let sit for at least 10 minutes so the dough is not grainy.
Preheat oven to 350 degrees F. Prep a muffin tin with non stick spray and cupcake liners. Scoop batter into muffin tin.
Bake for 20-25 minutes or until a toothpick comes out clean. Let cool completely before frosting.
Let's make frosting! In a bowl, add cream cheese, butter, vanilla and maple syrup. Beat together until fully combined.
With an offset spatula, frost the muffins anyway you like. You can get fancy and use a cake decorating tip as well, but today I went for quick and easy.


Enjoy! I hope you like this recipe.


Follow the ZeldaGourmet to bring 
LOZ into your home everyday! Enjoy!
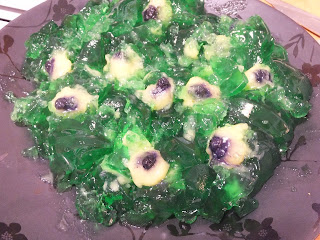

Quest 74: Vitreous - Gelatin Boss Fight


It's time to do a boss fight! Vitreous is the sixth boss in A Link to the Past in Misery Mire. Described as "a gigantic eyeball surrounded by smaller eyeballs, immersed in an acidic green liquid" certainly sounds yummy, but I think we can make it a little more palatable. Enjoy today's quest to defeat this monster on our quest to save the princess and ourselves from hunger. Enjoy!


Gear!
Large Box Lime Gelatin 
2 cups boiling water
2 cups cold water
Small Box Instant Lemon Pudding
2 cups milk, cold
A dozen blueberries
2 envelopes Knoxx unflavored gelatin
Blueberries
Silicone Ice Cube Tray
Bundt pan


Quest!
 In a bowl, add one envelope of unflavored gelatin to the bowl along with the 2 cups of cold milk. Let gelatin bloom for about 5 minutes. Add lemon pudding mix and mix together for about 2 minutes. It should be pretty thick. Set aside until you get the ice cube trays set up.


I used a flower silicone ice cube tray from IKEA. This one is nice because it has a place for the blueberries to sit in. Speaking of which, add the blueberries to the bottom of your tray. Any shape should work, but something rounded is appropriate for the eye shape we are trying to achieve.

Once you get the tray all set up with blueberries, add the lemon pudding to the tray. Set in the fridge to set up for several hours. You will have extra lemon pudding, so eat up! It's yummy!

 In a bowl, add the other envelop of unflavored gelatin along with the large box of lime gelatin. Add the boiling water and stir to dissolve. Add the cold water to the mixture and stir. Once combined, pour into bundt pan to create a shape. Set in the fridge to set up until fully set.
 I did have a little trouble getting my eyes out of the ice cube tray, so I did pop it into the freezer for about an hour and that seemed to help.
 Add the eyes to the main gelatin mold by cutting into the gelatin and pushing the eye into the slit.
Do this all the way around until they are all in the mold.
 In order to demold this thing, first add hot water to a large bowl. hold the bottom of the bundt pan into the hot water for about 30 seconds. Place a plate on top of the bundt pan and flip it over. If all goes relatively well, you should have something salvageable.
 Like this! It looks a little goofy, but take a spoon and flip the eyes around a little more . . .
Ta-da! Your very own boss monster! This is pretty refreshing on these hot summer days, and I hope you will enjoy it too. 


Be sure to follow on social media to stay up-to-date with all the latest from the Zelda Gourmet!


Quest 67: Deku Nut Cheesecake

We have been really busy lately! We have been out in the forest gathering Deku Nuts and boy did we make a haul! (BTW hazelnuts are  really harvested in the late summer!) With all these lovely Deku Nuts, we are going to attempt the best. thing. ever! CHEESECAKE! This is a gluten free rendition of the cheesecake I used to make before being diagnosed with Celiac - now with a Deku Nut twist. Sweet and rich - you might want to wear sweatpants when you eat this one - Enjoy!


Gear!
Crust
1 cup assorted GF Cookies, crushed (I used chocolate sandwich cookies and hazelnut wafer cookies!)
3 tablespoons white sugar
1/4 cup butter, melted
3- 8oz. packages cream cheese, softened

Filling
3/4 cup sugar
2 tablespoons GF AP flour with xianthium gum
3 eggs
2 tablespoons milk or cream
2 teaspoons vanilla
3 ounces semi-sweet chocolate
1/4 cup Nutella

Frosting
8 ounces semi-sweet chocolate
2/3 cup sour cream
1 1/2 cups hazelnuts, chopped

Quest!

Preheat oven to 325 degrees F. Prep a 10-inch spring-form pan with nonstick spray.
Prep your crumbs by placing your cookies into a zip topped bag, seal and smack with something heavy - I like a rolling pin myself, but use whatever you like.

Mix cookie crumbs, 3 tablespoons sugar, and butter in a bowl until thoroughly combined
Press crumb mixture into the bottom of the pan. Bake in oven for about 10 minutes. Set completed crust aside to cool.
Now for the filling. Get your trusty mighty mixer out and add the cream cheese - beat for a few seconds break it up and make it smooth. Beat in the sugar and flour until the mixture is smooth. Adding one at a time - beat in the eggs. Once fully incorporated, add the milk and vanilla. Continue beating the mixture until morale improves - or until the cream cheese filling is very smooth and well combined, about 3 minutes.
Add about 2/3 of the filling to the crust. Spread out evenly.
In a bowl, melt 3 oz. chocolate -preferably in a double boiler. Mix chocolate in with remaining filling.
Add Nutella and continue to stir until combined.
Plop the remaining batter in dollops over the first layer of filling.
Using a knife or flat wooden skewer, create a marble effect in the cheesecake until it is pretty,
Place the cheesecake in the oven. In a roasting pan beneath the cheesecake, add boiling water to create a steaming effect in the oven. Bake at 350 degrees F. for 45-50 minutes or until cheesecake is set. Cool for 15 minutes or so before removing the outside ring of the pan. Let cheesecake cool completely.
Baked and cooled!
Frosting time! Melt your chocolate in a double boiler. Add Sour Cream and stir, stir, stir until smooth.
Spread frosting over the cake.
Add chopped hazelnuts (deku nuts) to the sides of the cheesecake and whole hazelnuts on the top. Refrigerate for an hour before serving. Enjoy!


Be sure to follow on social media to stay up-to-date with all the latest from the Zelda Gourmet!


Created By Sora Templates