Yum
Showing posts with label cake. Show all posts

Quest 100: Heart Container Cupcakes

Happy 100 Quests! We have been questing for awhile now and I wanted this post to be extra special. So today I sharing with you THE recipe for the cupcakes that are so popular with my family. I often make these for when we people over for board game days and other get-togethers. These are super chocolately and I will bet you that you can't just have one. For being gluten free, these cupcakes will definitely fill your heart container. Enjoy!

Gear!
1 GF chocolate cake mix - Betty Crocker
1 GF brownie mix - Betty Crocker
6 eggs
1 cup water, hot
2 tsp instant espesso
1 stick butter (1/2 cup) softened
1 tsp vanilla
1 tsp baking powder

Quest!
For this particular recipe, you do need to use these particular mixes. They normally make a small pan of brownies and a single layer cake.


In a mixer, beat eggs until light yellow.


In a measuring cup, measure out your hot water from the tap. Then add instant espresso powder. Mix and let it sit for a little bit.


Add softened butter, vanilla and baking powder to eggs. Mix until combined.


Add mixes to the bowl and stir on low. Add in espresso mix and continue to mix for 2 minutes on medium. Should be like a cake mix when done. Let this sit for at least 5 minutes for the flour to fully absorb the liquid.


Preheat the oven to 350 degree F. Get your cupcake liners ready in the pan and make sure to spray the liners with non stick spray. Spoon the cake mixture in so they come up about 3/4 of the way full. Should make 24 cupcakes.


Bake for 18-23 minutes or until a toothpick comes out clean when inserted into the cupcakes. Transfer to a wire rack and cool completely.
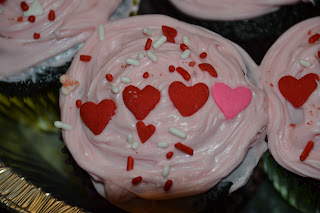
Once completely cooled decorate with your favorite frosting. Today with have a light pink vanilla frosting.


Add red and pink hearts to indicate how much life the hero still has. Add some extra sprinkles for fun and Enjoy!


Follow the ZeldaGourmet to bring 
LOZ into your home every week! Enjoy!

Quest 96: Chocolate Coconut Cave Cake


There are many, many caves in the LoZ series. Including the very first one where the Old Man warns that it is dangerous to go alone. Of course, he doesn't accompany you, but at least you end up with a sharp stick to protect yourself. Today, I have for you different kind of cave - a cave of wonders if you will - at least if you like coconut. The concept is pretty 1950s, but the results are gluten free and delicious. Enjoy!

Gear!
Gluten Free Chocolate Cake Mix -We used Pillsbury
Mayonnaise instead of oil in recipe, plus the ingredients on the box
1 tsp. Vanilla Extract

Filling:
2  egg whites
1/4  cup granulated sugar
1 cup shredded sweetened coconut flakes 
1 T tapioca flour 
1 tsp vanilla 

Glaze:
1/2 cup butter (1 stick)
3 T milk
2 cups powdered sugar

Quest!
Prep the bundt pan by thoroughly spraying the pan with non stick spray. Preheat the oven to 400 degrees F. Start with the cake mix. Find out what you need to make this cake mix and make it better! Exchange the oil with mayonnaise and add the other ingredients and mix well with a mixer. 


Add about half the cake mixture to the pan.
Get started on the filling. Whip egg whites until soft peaks form. Add in sugar and whip together.

Mix tapioca flour and coconut together and fold gently into the egg whites.
The result should come together in a chunk.


Spoon filling over the first half of the cake mixture. Top with remaining cake mixture. Bake in the oven for 45 minutes and check for doneness.

It will dome up and pull away from the edges when it is done.
When the cake is cool but not cold remove from pan. It should release easier than if you wait until it is cold.
Let's make glaze. Melt butter in a sauce pan until just melted. Take off heat. Add milk and powdered sugar. Stir until it makes a smooth glaze.

Drizzle over the completely cooled cake in a fancy design and Enjoy!

Follow the ZeldaGourmet to bring 
LOZ into your home everyday! Enjoy

Quest 76: Maple Carrot Cake Muffins


In all the recipes that we have done, we have not considered Epona or anything even remotely associated with her. Now Epona is a good horse and deserves some recognition for all the times she has hauled me around Hyrule field on some side quest to find a - oooh piece of candy. So in honor of our friend Epona, we are making a carrot recipe - and don't worry it won't be the last. This is one of my favorite recipes and it's pretty easy too. With a little GF baking know-how, there is not much difference if you want to make this GF or regular flour. Enjoy!

Gear!
3 cups shredded carrots
2 cups GF AP Flour - with xanthium gum
1 cup sugar
1 t baking powder
1 t baking soda
1 t cinnamon
1/2 t salt
4 eggs
1 cup vegetable oil
1/2 cup maple syrup

Frosting
8 oz cream cheese
1/4 cup butter
1 t vanilla
1/4 cup maple syrup
Chopped walnuts - optional

Quest!

In your mixing bowl, add together carrots, sugar, cinnamon, eggs, vegetable oil, and maple syrup. Mix together
Add flour, baking powder, baking soda, and salt. Mix together until smooth. Let sit for at least 10 minutes so the dough is not grainy.
Preheat oven to 350 degrees F. Prep a muffin tin with non stick spray and cupcake liners. Scoop batter into muffin tin.
Bake for 20-25 minutes or until a toothpick comes out clean. Let cool completely before frosting.
Let's make frosting! In a bowl, add cream cheese, butter, vanilla and maple syrup. Beat together until fully combined.
With an offset spatula, frost the muffins anyway you like. You can get fancy and use a cake decorating tip as well, but today I went for quick and easy.


Enjoy! I hope you like this recipe.


Follow the ZeldaGourmet to bring 
LOZ into your home everyday! Enjoy!


Quest 43: Triforce Triple Berry Trifle

In the U.S. it is time once again to celebrate our independence and what better way than with things that are in season - Berries!! Being that there are so many berries in season all at once where I dwell, these work really well with our favorites like lemon curd and cool whip and cake. Don't worry - we'll make this Zelda related by using Triforce shapes. It may be a bit of a stretch, but it sure is delicious. Enjoy!


Gear! Get the printable recipe here!
1 yellow cake - I used a GF Betty Crocker mix this time
2 cups of lemon curd - ingredients below
6 oz. marscapone cheese
2 T. lemon juice
4 T. sugar separated
1 cup heavy whipping cream
2 cups sliced strawberries
2 cups blueberries
2 cups raspberries

Lemon Curd 
5 Egg Yolks
1 Cup Sugar
1/3 cup of fresh lemon juice and zest (about 3 lemons worth)

1 Stick of Butter - Cut into small pieces then chilled

The Quest!


First, let's make the lemon curd! We covered this in our Pi Day Special and I can't encourage you enough to make your own. It is so easy and so much cheaper than buying it. Anyways, in a double-boiler bowl, combine egg yolks and sugar whisk until smooth, about 1 minute. Zest and squeeze the lemons. Add juice and zest to egg mixture and whisk smooth. Place on double boiler. Continuously whisk until thickened over medium heat, approximately 8 minutes, or until mixture coats the back of a spoon and is generally the consistency of pudding. Remove promptly from heat and stir in butter a piece at a time. Transfer to a container and chill for at least 2 hours.

Next prepare your cake. You can make a cake from scratch, use a cake mix or a pre-made cake from the bakery - really whatever floats your boat. Cut your cake into small slices. Wash and prep your berries.
Note: I used a GF Betty Crocker Cake Mix. This makes the equivalent of a one layer cake. So, you may need to double your berries and cream filling if you are using a two layer cake. 


With a hand mixer, whip your cream with 2 T. of sugar until you have stiff peaks - not butter!!! Set aside. Beat your marscapone cheese with 2 T. of sugar until soft then add lemon juice and mix to combine. Fold in whipped cream.


In a bowl place a layer of berries. You can chooses to either keep your berries separated as I did or you can mix them together. Then add a layer of marscapone cheese mixture on top of the berries. The next layer is a layer of cake followed by a layer of lemon curd. Then we repeat the layers.


On the top of the layers, place three golden triangles of cake that were left from the remnants of cake. Divide the remaining berries into three parts around the triforce. Enjoy!


Be sure to follow on social media to stay up-to-date with all the latest from the Zelda Gourmet!

Quest 41: Princess Hilda Cake

I was looking through my recipes the other day and decided that we have not done enough - if anything to highlight A Link Between Worlds. So today that is just what we are going to do. Does anyone remember Barbie Cakes? I think people still make them and they are the inspiration for our cake today - with a little Princess Hilda flare! This cake is going to be decorated with gold leaf. If you don't get the eatable kind, make sure to not let your kids eat that part - you shouldn't either. Enjoy!


Gear! Get the Printable Recipe Here!
Doll cake pan
Doll - if pan does not come with one
Cake Mix - We used Pillsbury GF Funfetti
Water
Eggs
Mayonaisse
Vanilla Extract
1 Can of Vanilla Frosting
White Fondant
Purple Spray Food Coloring
Gold Leaf
Popsicle Stick
Fondant Rolling Pin (plastic)
Wire for Crown


The Quest!
First we have to make the cake! There are many variations of Doll cake pans. Follow your manufacturer's information. My pan was assembled with a heat poll in the center to help the cake cook faster since it was all one piece. Other pans may have you make your cake in two parts. For the cake mix, I followed the recipe on the back with the exception of substituting the oil for mayonnaise and adding a teaspoon of vanilla extract.


I baked the cake per the pan directions at 350 degrees F for 50 minutes. It turned out really well and if you prepare your pan right - it pops right out! Let the cake cool completely.


Once the cake is cooled, apply a thin layer of frosting to help the cake from drying out. I also put the cake on a cake turner to frost easier.


Next, I fixed up the doll. Now some dolls are just a head and torso and some will be a whole doll. The one I worked with just had a torso and head. I first worked on her makeup a little more with some pink and gold Sharpie markers. I also fashioned a crown out of some gold wire from a champagne bottle.


Next, I took a small amount of fondant and began squishing it in my hands to soften - this can take several minutes for pre-made fondant. Then rolled out the fondant into a thin even sheet. I dry fit the piece first to make sure it was the right size. Then painted it with the spray food coloring. When dry, attached to the torso by wrapping around the it and adding a small amount of water with your finger to make the fondant stick to itself.


To finish up the doll portion of the project, I made open gloves for the doll using the same method only not painting. I also wrapped the fondant around a stick and secured them before pushing them up along the arms of the doll.


Let us next turn our attention to the dress part of the project which mainly deals with the cake part. I have attached the doll to the cake via a little frosting. I then took the remaining vanilla frosting a started to apply a generous amount to create the skirt. I used an offset spatula to do this, making large swirls as I went to create a draping effect.


I then made a cape for Princess Hilda as she is often depicted with by rolling out more fondant to size and lightly spraying with purple color to create a shadow effect. I made fondant balls and covered them with gold to create the shoulder plates to the cape.


The final touches to the lovely cake was the creation of the sash in the front. In the picture I saw that it wraps around her, so I rolled a small strip of fondant out and painted it purple. Then made a separate piece for the sash itself. I decorated the sash with gold of an upside down triforce. I also made impressions in the fondant with a toothpick.

I wrapped the first piece around the doll's waist then with a little water on my finger attached the front sash.

For the staff, I painted a popsicle stick purple. Added a piece of leftover purple fondant to the top with frosting. Then attached a triforce shaped piece of fondant wrapped in gold in the same fashion.


Be sure to follow on social media to stay up-to-date with all the latest from the Zelda Gourmet and check us out on Twitch where we play a lot of Zelda Games!


Quest 11: Rupees, Rupees Everywhere!

Rupees may not make the world go around, but let me tell you - they sure do help. The only LOZ game that actually doesn't utilize the currency is The Adventures of Link, but let's face it, collecting those leveling up points were hard enough w/o worrying about money. I know I find myself side-questing for money at some point in almost every title. Today, we are going to counterfeit our own rupees out of cake to create Petits Fours. These uber sweet treats will leave you tweaking in the corner. Enjoy!


Gear . . . 
Cake
2 cups gluten free all purpose flour xanthan gum
1 1/2 c. sugar
3 1/2 teaspoons baking powder
1 teaspoon salt
1/2 c. shortening (Crisco - plain not butter flavored)
1 cup milk
1 teaspoon vanilla
4 egg whites

Filling
Raspberry Jam

Icing
2 pound bag of confectioner's sugar (sifted)
1/2 c. water
1/2 c. light corn syrup
1 teaspoon vanilla


Let the quest begin!
Let's begin by preheating the oven to 350 degrees F. Grease and flour the bottom of a  15 1/2 x 10 1/2 x 1 inch jelly roll pan.


Separate your egg yokes from the whites in two separate bowls. Set aside
 You don't need the yokes for this recipe, so you can make an omelet or even some custard, if you are ambitious enough.

In another bowl, mix together (using an electric mixer) flour sugar, baking powder, salt, shortening,  2/3 c. of milk and the vanilla on low speed for about 30 seconds. Scrap the bowl and beat on high for 2 minutes, scraping occasionally. Add the remaining milk and egg whites and beat on high for another 2 minutes. 

Ta-da!

Pour into the prepared jelly roll pan and spread out until even using a spatula.


Nice and even. Bake for 25 minutes. No more, no less.

As you can see, the cake is done, but not very brown.

See, pulling from the sides. 

When the cake is completely cooled, you can start cutting your shapes.  I am using a rectangle shape and then later I will trim the corners to make the rupee shape. If you can find the right shape, let me know.


All cut out.
Trimming. 

Now that everyone is cut out and trimmed, I am going to heat up a  half pint jar of Raspberry Jam on medium low.
This will melt the jam and make it easier to apply to the cakes. 

Make sure the cakes are bottom side up before you start. Then with a brush, paint each on with the melted jam.
It will soak in.


To make the icing, start by putting together a double boiler. Basically a saucepan with about 1-2 inched of water with a metal or glass bowl on top. Add the all the ingredients for the icing (confectioner's sugar, water, corn syrup, vanilla and almond extract).  Heat until luke warm DO NOT OVERHEAT!!!

Remove from heat. This is the part where you would add some food coloring. I use Wilton cake frosting colors, but use whatever works for you. I started with blue and later I will make the remaining frosting green. 


I should note here that I have my cakes set up on a cooling rack that is set on top of of 13 x 9 x 2  pan. This creates drainage so that you can scoop up and reuse the icing.
Pour the icing over the cakes. You can spread it out a little with a spatula.
When you are done with half of the cakes, scoop the icing back in the bowl, dye it green and pour over the rest. 


To add the 3D look to our rupees, I am using a Wilton white frosting squeeze bottle thingy. You can find them in the cake decorating section of the grocery store. 

Let them dry. This could take an hour or so.


Aren't they cute!! I hope you enjoyed this quest for rupees. When you come down from your sugar high, come see us again!

Get the printable version of this recipe here!


Enjoy!
Please leave me a comment if you have ideas 
or if you enjoy The Zelda Gourmet!


Created By Sora Templates