Yum
Showing posts with label majora's mask. Show all posts

Quest 102: Lime ChuChu Cookies

Chuchus are everywhere, but my favorite are the creepy version that shows up in Majora's Mask. The expression of the face and the fact that you can see what you will get as a reward are just too much. Today, we will capture these creepy little guys in a cookie with a sour twist - Lime ChuChu Cookies. They are basically a box of lime gelatin that got together with a sugar cookie. Surprisingly good with the sweet and sour combination. These are just about the simplest thing you can make. Enjoy!

Gear!
1-1/2 cups butter, softened
1 cup sugar
2 packets (3 oz) Lime Flavored Gelatin, divided
1 egg
1 tsp. vanilla
3-1/2 cups gluten free AP flour with xanthium gum - We used Pamela's!
1 tsp. baking powder
Candied eyes, heart pieces
Green Sugar Glitter


Quest!
Preheat the oven to 400 degrees F. 

Cream together butter, sugar and 1 of the gelatin packets. Add egg and vanilla, Stir. Add in Flour and baking powder. Stir to combine. Let dough sit for 10 minutes.

Pour our second gelatin packet onto a plate. Form dough into 1 inch balls and dip into gelatin powder. Place on a baking sheet and with a cookie stamp or bottom of a flat glass, press each cookie flat. Add eyes, heart piece and additional sugar glitter. 

Bake for 8-10 minutes or until just turning golden. 

Cool on sheet for a minute or two before transferring to a cooling rack. 

Repeat until all cookies are baked. 

Enjoy!


Follow the ZeldaGourmet to bring 
LOZ into your home every week! Enjoy!


Quest 75: Frog Legs


Frogs, frogs, frogs. It seems that frogs are definitely a reoccurring theme throughout many LOZ games. Some are used for medicine and some will sing and play games with and give you gifts for playing along. Well today we have taken a much different approach to the frogs that have brought us joy - they are on the menu. Yes, frog legs to be exact. Now to be honest with you, this was my first time having frog legs, so I wasn't 100% sure what to do with them. In fact, looking at the package with the frog legs inside reminded me of 7th grade science on dissection day - minus the smell of formaldehyde. So, like everything else in this world - I googled it to see what other people did with them. Turns out the vast majority of the recipes found were either deep fried or the French style. I have decided to put my own slant on the French style today for a couple reasons. First, I don't really want to do a lot of deep frying - you can deep fry anything - trust me the MN State Fair is just around the corner. Secondly, I have a partial bottle of Merlot left in the fridge and I think they will go quite well with this dish. In any case, I hope you too will give frog legs a try - maybe even with this recipe. Enjoy!

Gear!
2 pairs of frog legs
1/2 cup milk
2 T. AP GF flour
1 T. butter
1/2 t. salt
1/2 t. red pepper flakes
1/2 t. parsley flakes
1/2 t. paprika
1 t. garlic, chopped
1/2 c. Merlot
1 T. butter
2 T. fresh parsley
1 T. lemon juice

Quest!

First, we need to butcher our frog legs. Not as scary as it sounds. We just need to divide them into separate legs.
Soak the legs in milk for 30-45 minutes. Buttermilk might be a nice choice for this for future reference.
Let's get the coating ready. In a shallow dish, mix together flour, salt, red pepper flakes, parsley flakes and paprika.
Dredge legs in the flour mixture.
Melt 1 T butter in a nonstick pan. Add legs to pan and cook until golden golden brown. About 2-3 minutes per side.
Remove legs from pan and work on the sauce.
Add garlic to the pan and let cook for a minute. Add Merlot and cook down until reduced by half, Add fresh parsley and 1 T. butter to finish the sauce.
Add the legs back into the sauce to reheat. Coat in the sauce and serve.
Ta-da! Interesting and tastes somewhere between mussels and chicken. The Merlot really works well with the dish - as predicted. Hope you enjoyed!


Follow the ZeldaGourmet to bring 
LOZ into your home everyday! Enjoy!


Quest 74: Vitreous - Gelatin Boss Fight


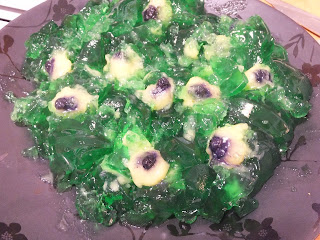
It's time to do a boss fight! Vitreous is the sixth boss in A Link to the Past in Misery Mire. Described as "a gigantic eyeball surrounded by smaller eyeballs, immersed in an acidic green liquid" certainly sounds yummy, but I think we can make it a little more palatable. Enjoy today's quest to defeat this monster on our quest to save the princess and ourselves from hunger. Enjoy!


Gear!
Large Box Lime Gelatin 
2 cups boiling water
2 cups cold water
Small Box Instant Lemon Pudding
2 cups milk, cold
A dozen blueberries
2 envelopes Knoxx unflavored gelatin
Blueberries
Silicone Ice Cube Tray
Bundt pan


Quest!
 In a bowl, add one envelope of unflavored gelatin to the bowl along with the 2 cups of cold milk. Let gelatin bloom for about 5 minutes. Add lemon pudding mix and mix together for about 2 minutes. It should be pretty thick. Set aside until you get the ice cube trays set up.


I used a flower silicone ice cube tray from IKEA. This one is nice because it has a place for the blueberries to sit in. Speaking of which, add the blueberries to the bottom of your tray. Any shape should work, but something rounded is appropriate for the eye shape we are trying to achieve.

Once you get the tray all set up with blueberries, add the lemon pudding to the tray. Set in the fridge to set up for several hours. You will have extra lemon pudding, so eat up! It's yummy!

 In a bowl, add the other envelop of unflavored gelatin along with the large box of lime gelatin. Add the boiling water and stir to dissolve. Add the cold water to the mixture and stir. Once combined, pour into bundt pan to create a shape. Set in the fridge to set up until fully set.
 I did have a little trouble getting my eyes out of the ice cube tray, so I did pop it into the freezer for about an hour and that seemed to help.
 Add the eyes to the main gelatin mold by cutting into the gelatin and pushing the eye into the slit.
Do this all the way around until they are all in the mold.
 In order to demold this thing, first add hot water to a large bowl. hold the bottom of the bundt pan into the hot water for about 30 seconds. Place a plate on top of the bundt pan and flip it over. If all goes relatively well, you should have something salvageable.
 Like this! It looks a little goofy, but take a spoon and flip the eyes around a little more . . .
Ta-da! Your very own boss monster! This is pretty refreshing on these hot summer days, and I hope you will enjoy it too. 


Be sure to follow on social media to stay up-to-date with all the latest from the Zelda Gourmet!


Side Quest: Craft Night - Majora's Mask


I haven't posted a craft project in a while and I wanted to share with you one that I just finished up. So today, I share with you my newest walk decoration of Majora's Mask. This took a weekend to complete because of the drying time, but is generally pretty simple to make.


Gear!

  • Corrugated Cardboard
  • Paper Towels
  • Decoupage Glue - Gloss
  • Markers
  • Acrylic Paints


Quest:
Start by cutting your cardboard into a large heart shaped piece. Draw lines to determine where the base of the eyes will be and to divide the mask into four quadrants.

 Cut out eye and mouth shapes to give the mask dimension. Also cut ten spike shapes for around the bottom and horns of the mask. Attach the eye and mouth shapes with glue on the top. Glue the spikes from the bottom side.


Cut paper towels into small pieces. Pour about a 1/4 cup of the Decoupage glue onto a paper plate. Dip the paper towel pieces into the glue and place, slightly overlapping each other onto the mask.

The first layer once dried does not look great. That is why I added a second layer. It also helps to develop the dimension of the layers that were added with the cardboard.

This is what the mask looks like with two layers and completely dry. The contouring comes out much better. From here, it's is about painting with the acrylic paints. Outlining the eyes and other detailing with markers. Add two more layers of Decoupage glue over the top to seal the whole thing.


Ta-da! I hope you enjoyed this craft and make one for your own Zelda den!


Quest 67: Deku Nut Cheesecake

We have been really busy lately! We have been out in the forest gathering Deku Nuts and boy did we make a haul! (BTW hazelnuts are  really harvested in the late summer!) With all these lovely Deku Nuts, we are going to attempt the best. thing. ever! CHEESECAKE! This is a gluten free rendition of the cheesecake I used to make before being diagnosed with Celiac - now with a Deku Nut twist. Sweet and rich - you might want to wear sweatpants when you eat this one - Enjoy!


Gear!
Crust
1 cup assorted GF Cookies, crushed (I used chocolate sandwich cookies and hazelnut wafer cookies!)
3 tablespoons white sugar
1/4 cup butter, melted
3- 8oz. packages cream cheese, softened

Filling
3/4 cup sugar
2 tablespoons GF AP flour with xianthium gum
3 eggs
2 tablespoons milk or cream
2 teaspoons vanilla
3 ounces semi-sweet chocolate
1/4 cup Nutella

Frosting
8 ounces semi-sweet chocolate
2/3 cup sour cream
1 1/2 cups hazelnuts, chopped

Quest!

Preheat oven to 325 degrees F. Prep a 10-inch spring-form pan with nonstick spray.
Prep your crumbs by placing your cookies into a zip topped bag, seal and smack with something heavy - I like a rolling pin myself, but use whatever you like.

Mix cookie crumbs, 3 tablespoons sugar, and butter in a bowl until thoroughly combined
Press crumb mixture into the bottom of the pan. Bake in oven for about 10 minutes. Set completed crust aside to cool.
Now for the filling. Get your trusty mighty mixer out and add the cream cheese - beat for a few seconds break it up and make it smooth. Beat in the sugar and flour until the mixture is smooth. Adding one at a time - beat in the eggs. Once fully incorporated, add the milk and vanilla. Continue beating the mixture until morale improves - or until the cream cheese filling is very smooth and well combined, about 3 minutes.
Add about 2/3 of the filling to the crust. Spread out evenly.
In a bowl, melt 3 oz. chocolate -preferably in a double boiler. Mix chocolate in with remaining filling.
Add Nutella and continue to stir until combined.
Plop the remaining batter in dollops over the first layer of filling.
Using a knife or flat wooden skewer, create a marble effect in the cheesecake until it is pretty,
Place the cheesecake in the oven. In a roasting pan beneath the cheesecake, add boiling water to create a steaming effect in the oven. Bake at 350 degrees F. for 45-50 minutes or until cheesecake is set. Cool for 15 minutes or so before removing the outside ring of the pan. Let cheesecake cool completely.
Baked and cooled!
Frosting time! Melt your chocolate in a double boiler. Add Sour Cream and stir, stir, stir until smooth.
Spread frosting over the cake.
Add chopped hazelnuts (deku nuts) to the sides of the cheesecake and whole hazelnuts on the top. Refrigerate for an hour before serving. Enjoy!


Be sure to follow on social media to stay up-to-date with all the latest from the Zelda Gourmet!


Side Quest: Craft Night! Owl Quilt

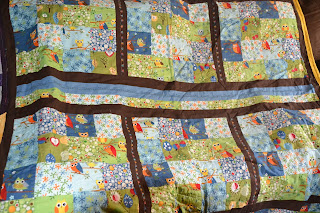
Kaepora Gaebora is a crazy owl that has a whole lot of say. Between Ocarina of Time and Majora's Mask, he is mostly not helpful, but at least has his heart in the right place in trying to give advice. In honor of this character, I have created an owl quilt that is just as crazy as he is. This quilt was made in square sections of 4 inch squares and then put together with 2 1/2 inch strips. Before putting together the layers of the quilt, I did some embroidery on the strips to add some extra embellishment. Quilting is a great hobby, and if you can sew with a 1/4 inch seam line in a straight line, you too can make a quilt! Enjoy!


Quest 40: Snapper Den!

Today's quest takes us deep into Woodfall where we find ourselves among the Snappers. These devilish turtles spin themselves around in order to knock us down and keeping us from reaching our goals. Therefore, we shall make a nummy treat of these Snappers that will make you lick your fingers clean!. These turtles would also be fun for a Mario Party or other video game themed get together. Enjoy!


Gear! Get the Printable Version Here!
6 oz. Royal Blue Candy Melts
6 oz. Dark Chocolate Candy Melts
3 oz. White Candy Melts
1/8 cup Caramel Sundae Sauce
1/2 cup Whole Pecans
1/2 cup Whole Walnuts
Silicone Mat or Parchment Paper
1/4 Measuring Spoon
Disposable Measuring Spoon


The Quest!

Arrange your nuts in a star pattern on  a silicone mat or parchment paper.


In a double boiler, melt the dark chocolate candy melts until just melted.


Spoon the chocolate over the arranged nuts to create the base of the candy. Let set up for a few minutes.


Taking the hot water from the double boiler, dip a 1/4 teaspoon into the hot water to warm the spoon and scoop out a ball of caramel sauce. Place the caramel ball onto each of the candies and let the chocolate set up completely.


Melt the royal blue candy melts in a double boiler until just melted. Spoon over the turtles to form the shell of the turtle. Let set up completely.


In a disposable icing bag, add the white melting candies. Place on a paper plate and microwave for a minute. Note: I checked mine every 30 seconds and still ended up with a small hole melted into the bag. Candy will be hot, so caution.


Snip off the very end of the bag and pipe a ring around the edge of each turtle.


Once this is completed, use any remaining to create designs on the shell. Let set up before serving.


Be sure to follow on social media to stay up-to-date with all the latest from the Zelda Gourmet!
Created By Sora Templates