Yum

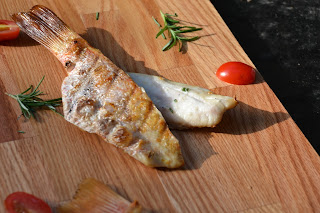
Quest 71: Reekfish

Summer is going strong here in Minnesota, which gets us out on the grill a lot more. I have been planning on doing Reekfish for a while now, but just didn't know what kind of reek we wanted to go with. Well today, I think I can finally share with you a recipe that has the right kind of reek that we can all get behind - garlic! This Twilight Princess delicacy is sure to please. Enjoy!


Gear!
2 Whole Red Snapper Fillets - Tails intact
Garlic Rosemary Compound Butter - recipe below
Olive Oil
Salt
Pepper


Quest!
Compound butter is first . . .
 In a food processor add 5 garlic cloves,  2 fresh sprigs of rosemary, 1 tsp course salt and 1 tsp black peppercorns.
 Pulse together until garlic and rosemary is mince. Peppercorns may not fully grind.  Add a stick of unsalted butter. Pulse together until butter is fully incorporated with ingredients.


Spread butter onto plastic wrap. Form back into a stick shape. Place in the refrigerator for 2+ hours. Use within about a week or freeze and it will keep for about 2 months.
Let's make Fish! Today we are using Red Snapper, but you are looking for a nice fresh firm white fish that still has skin and a tail to keep things together.

Get the grill started! You want the grill nice and hot. Today we are using gas, but charcoal should work fine too.
 Open your fish up and pat dry with paper toweling - do this on the outside too. Check for bones by running your fingers over the flesh of the fish. Pull out any bones with clean pliers.
 Take 2-3 tablespoons of that lovely compound butter we made earlier and rub it into each inside part of the fish. Be sure to really rub it in to get the flavor penetrating. Sprinkle with salt and pepper.
 Close the fish back together again. Brush the outside of the fish skin with olive oil. We used garlic infused olive oil in order to add even more garlic the party.
 Place the fish onto the hot grill. Cook the fish about 5-6 minutes aside or until the fish is flaky.  The outside skin should begin o blister and give good grill marks.
Enjoy this very garlicy fish with potatoes or Hylian Shroom Polenta!


Be sure to follow on social media to stay up-to-date with all the latest from the Zelda Gourmet!
Quest 70: Hylian Shroom Polenta

I am super excited about the new LOZ: BotW game coming out. This has been a very exciting E3 week in general. So to kick things in the right direction. I am sharing a recipe we really enjoy in our house and also celebrates the introduction of the Hylian Shroom to the repertoire of ingredients found in the newest addition to the Zelda family. The wheels were definitely turning as I watched all the Treehouse footage this week - and the possibilities are looking pretty good. Anyways, if you haven't seen the trailer - where have you been? Get on YouTube and watch it! I hope you like this recipe/ Enjoy!

Gear!
8 oz sliced mushrooms -I recommend using a variety of mushrooms for this because it really brings out the mushroom flavor.
2 T butter, divided
2 tsp salt
1 cup uncooked polenta
1 cup heavy cream
3-4 cups mushroom broth
1 cup grated Parmesan cheese


Quest!

In a sauce pan, melt 1 T butter and add mushrooms. Cook together until mushrooms start to develop good color.


Add a 1 tsp of salt cook another 1-2 minutes. Remove from heat onto a plate for later.
 In the same saucepan, add 1 T butter, polenta, cream, 1 t. salt and 3 cups of broth.. Bring to a near boil, stirring regularly to keep it from stick to the bottom. Add more broth if the polenta is still uncooked, but had absorbed all the liquid.
 When is done, it will have absorbed most of the liquid and be a nice creamy consistency. This takes about 18- 20 minutes.
 Add grated Parmesan and mushrooms into the done polenta.
 Stir together until melted and delicious.
Enjoy with pork, beef, or just by itself. Leftovers are amazing the next day.


Be sure to follow on social media to stay up-to-date with all the latest from the Zelda Gourmet!

Quest 69: Hyrule Baked French Toast


It has been a few weeks since the last post, and it has been eventful indeed. I just attended the gluten free feast in Minneapolis last week and there were a lot of different things I haven't had before. Both good and bad, GF products certainly run the spectrum of taste. It made me think about things I really used to enjoy before being diagnosed with Celiac and French Toast certainly made that list. The flavors are pretty generic and GF; however the bread is usually an issue. GF bread does not have a great reputation for being awesome. I have found some really horrible bread and some decent. Now, today I am using a brand that I have latched onto because I like it, but I am not being sponsored to use it. I hope you have options in your area and that you have the ability to try different ones to find what you like. Enjoy!

Gear!
8 Slices of Hearty Artisan GF Bread - such as Schar
4 Eggs
1 c.Half and Half
1 T. Cinnamon
1 T. Maple Syrup
1 t. Salt
1 T. Vanilla
Powdered Sugar
Strawberries

Quest!

In a throwaway aluminum pan, crack your eggs, add cinnamon, maple syrup, vanilla and sugar. Beat together until it comes together.


Add half and half to the mix and beat together.
 Add the bread to the mixture. I dip the bread and stack it on top of each other, so that it all gets a start on the soaking process. Cover with plastic wrap and place in the fridge overnight.

In the morning, a good deal of the mixture has been soaked up. Preheat the oven to 400 degrees F. Bake in the oven for approx. 20-25 minutes.
The baked toast will be golden and delicious. As an added bonus, the remaining soak becomes custard that is super tasty.
Serve along side some bacon. Top with powdered sugar, Triforce cut strawberries and more maple syrup.This brunch should give you the Power to get through another lazy Sunday.


Be sure to follow on social media to stay up-to-date with all the latest from the Zelda Gourmet!

Quest 68: Ramen

We all know that soups show up within the Zelda franchise often and all of them work towards refueling our heart containers. Today, we are making an awesome ramen soup that is both super hearty and will turn you off from grocery store ramen (if you can even eat it) for the rest of your days. If this doesn't fill up your heart container, I am not sure what will. Enjoy!


Gear!
1 lb Flank Steak
1/4 cup Green Onions
1/2 cup Snow Peas
1/2 cup Sliced Mushrooms
3 Eggs
32 oz. Beef Broth
1 cup Water
1 t. Fresh Ginger, finely grated
1 Thai Chili, sliced thinly
1 T. Lemon Grass, sliced thinly
1 t. Cilantro, finely chopped
1 Nori Sheet, sliced thinly
GF Black Bean Noodles or Rice Noodles
salt & pepper to taste

Steak Marinade
1/4 c. Lime Juice
2 t. GF Soy Sauce
2 t.. Housin
2 t..Szechuan Sauce
2 t. Asian BBQ Sauce
2 t.Worcestershire Sauce
2 t. Roasted Garlic, minced


Quest!


Marinate your flank steak in a gallon sized zip top bag with lime juice, soy sauce, housin, szechuan, Asian BBQ, Worcestershire Sauce and Roasted Garlic. Let sit together for at least 30 minutes but an hour or two would be better.


In a small sauce pan, add 3 eggs and enough cold water to cover. Bring them up to a boil, shut the heat off and cover. Leave alone for 5 minutes.


Immediately rinse eggs under cold water. Peel eggs and set aside for later.
In a sauce pan, add beef broth, water, ginger, nori, cilantro, thai chili, about half the green onions and lemon grass.
When it comes to a boil, add GF black bean or rice noodles. cook until softened.
Notes: I don't have a specific amount for the noodles b/c everyone likes less or more noodles. I used about half a package (3 oz.) of black bean noodles for this go round.

Add sliced mushrooms to broth. Leave a few mushrooms out for garnish later. Continue cooking together.


Divide your flank steak into two pieces. This will allow it to cook more quickly.
In a cast iron frying pan, add olive oil to the pan and seer your pieces of flank steak. We are only going to give the outside a good seer. We don't want to cook the meat all the way through.

Let the meat rest for 5-10 minutes.
Very thinly slice the meat with a knife. Paper thin is what we are going for. Yes, the meat is rare in the middle - never fear - we aren't done with it yet.
Add the meat to the broth mixture - leave a few pieces off to the side so that we have some garnish.
Cook until you are happy with the flavors and doneness of the meat. Ladle into bowls.
Garnish with snow peas, eggs, mushrooms, green onions, and meat. Enjoy!

Quest 67: Deku Nut Cheesecake

We have been really busy lately! We have been out in the forest gathering Deku Nuts and boy did we make a haul! (BTW hazelnuts are  really harvested in the late summer!) With all these lovely Deku Nuts, we are going to attempt the best. thing. ever! CHEESECAKE! This is a gluten free rendition of the cheesecake I used to make before being diagnosed with Celiac - now with a Deku Nut twist. Sweet and rich - you might want to wear sweatpants when you eat this one - Enjoy!


Gear!
Crust
1 cup assorted GF Cookies, crushed (I used chocolate sandwich cookies and hazelnut wafer cookies!)
3 tablespoons white sugar
1/4 cup butter, melted
3- 8oz. packages cream cheese, softened

Filling
3/4 cup sugar
2 tablespoons GF AP flour with xianthium gum
3 eggs
2 tablespoons milk or cream
2 teaspoons vanilla
3 ounces semi-sweet chocolate
1/4 cup Nutella

Frosting
8 ounces semi-sweet chocolate
2/3 cup sour cream
1 1/2 cups hazelnuts, chopped

Quest!

Preheat oven to 325 degrees F. Prep a 10-inch spring-form pan with nonstick spray.
Prep your crumbs by placing your cookies into a zip topped bag, seal and smack with something heavy - I like a rolling pin myself, but use whatever you like.

Mix cookie crumbs, 3 tablespoons sugar, and butter in a bowl until thoroughly combined
Press crumb mixture into the bottom of the pan. Bake in oven for about 10 minutes. Set completed crust aside to cool.
Now for the filling. Get your trusty mighty mixer out and add the cream cheese - beat for a few seconds break it up and make it smooth. Beat in the sugar and flour until the mixture is smooth. Adding one at a time - beat in the eggs. Once fully incorporated, add the milk and vanilla. Continue beating the mixture until morale improves - or until the cream cheese filling is very smooth and well combined, about 3 minutes.
Add about 2/3 of the filling to the crust. Spread out evenly.
In a bowl, melt 3 oz. chocolate -preferably in a double boiler. Mix chocolate in with remaining filling.
Add Nutella and continue to stir until combined.
Plop the remaining batter in dollops over the first layer of filling.
Using a knife or flat wooden skewer, create a marble effect in the cheesecake until it is pretty,
Place the cheesecake in the oven. In a roasting pan beneath the cheesecake, add boiling water to create a steaming effect in the oven. Bake at 350 degrees F. for 45-50 minutes or until cheesecake is set. Cool for 15 minutes or so before removing the outside ring of the pan. Let cheesecake cool completely.
Baked and cooled!
Frosting time! Melt your chocolate in a double boiler. Add Sour Cream and stir, stir, stir until smooth.
Spread frosting over the cake.
Add chopped hazelnuts (deku nuts) to the sides of the cheesecake and whole hazelnuts on the top. Refrigerate for an hour before serving. Enjoy!


Be sure to follow on social media to stay up-to-date with all the latest from the Zelda Gourmet!


Created By Sora Templates